

SoundBits Recorder
Recently, I had to record audio from a videoconference but did not find a simple free app that could do it properly. Some simple apps, like the Windows Voice Recorder, can only record one audio source at a time. That does not work for a videoconference because I needed to record the audio I was hearing from other people as well as my own audio from the mic. There were other solutions that worked fine (e.g., Voicemeeter or OBS Studio), but they are more complex than needed, and I wanted something simple, which I could teach other people to use without much effort. So, I wrote SoundBits Recorder, a free audio recorder that does exactly that!
SoundBits Recorder is an open-source audio recorder that can merge two audio inputs and save the resulting audio to an MP3 file. This is useful to merge audio from an input device (e.g., a microphone) with an output device (e.g., the sound being played by the computer). For example, this software can be used to record audio from online meetings (saving what the user is speaking on their mic and what they’re hearing from others) or to sing along a background recording. Or any other application you can imagine that requires recording computer audio and mic input at the same time.
System Requirements and Download
This software is officially tested and supported on Windows 10. It should work on Windows 11 too, although I was not able to test it yet. It may work on Windows 7 or 8, but I have not tested it and cannot guarantee it.
Just download and run the installer, then run the application to start using it.

Using the Application to Record

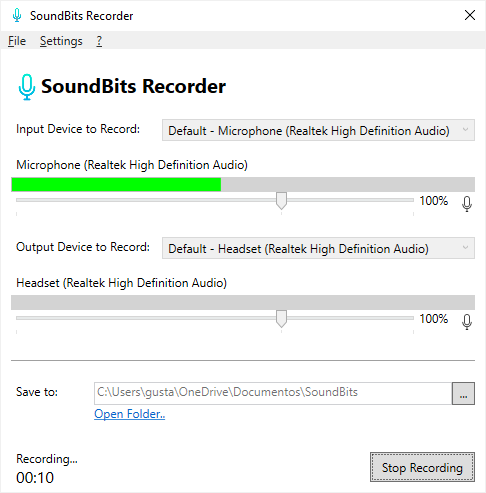
When you first open the application, it will detect your default audio input device (probably your microphone) and output device (probably your speakers or headphone). If you just have one of each device on your computer, you should not need to change those default settings. If you have more than one of each and you want to record a different device than the default, you can select which one you want to record. If you are not sure which one you are using, you can open Windows audio settings to check the names. Or, if you will be recording something specific like a videoconference, open the audio settings of your conference software (e.g., Zoom, Microsoft Teams, Google Meet, etc.) and check the names of the audio devices. Then, select the same devices on SoundsBits Recorder.
The coloured bars below each device name will show the current audio level coming from the device. It is normal to see those bars fluctuating quickly when there is audio being captured. If any bar is grey and you do not see any audio level, it means that the device is currently not capturing any audio. You may want to check if you have selected the correct device if that’s the case.
Below the level meter bars, you can adjust the recording volume for each device. The default volume is 100%, meaning that the recording will have the same volume as what is being captured. You can adjust the recording volume by dragging the level left to decrease it or right to increase it. Ideally, you want to keep the highest volume levels within the yellow range or just the start of the red range (near where the 100% is written or a bit to the left of it). If the bar is just within the green range, you can increase the volume. If the bar goes all the way to the right, then you need to decrease the volume, otherwise, the recorded sound may be clipped.
If you do not want to record input and output at the same time, you can mute one of them by clicking on the mic icon to the right of the volume level indicator. The mic icon will be struck when the device is muted. When a device is muted, no sound will be recorded from it and you will not see any movement in the audio level meter bar.
By default, the application will create a folder named ‘SoundBitsRecorder’ within your Documents folder, where all recordings will be saved. If you wish, you can select a different folder in the ‘Save to’ option. You can type the name of a folder in the text box or click the ‘…’ button to select a folder on a popup window.
When you are ready to start recording, click ‘Start Recording’. The button label will then change to ‘Stop Recording’ and a timer will appear on the bottom left of the window showing the length of the recording. Keep in mind that you can adjust the volume levels and mute or unmute the devices even while you are recording. However, you cannot select a different input or output device while recording.
To finish the recording and save the file, click on ‘Stop Recording’. The recorded audio will be saved to an MP3 file named with the current date and time in the folder selected in the ‘Save to’ option. The link ‘Open Folder…’ can be used as a convenient way to open the folder on Windows Explorer.
As a side note, please remember that in many countries, you are expected to obtain permission from all participants before recording them. Please remember to check the local regulations and ask for permission before recording other people!
Building your own version or contributing
Please check the project’s GitHub page for instructions on how to build your own version or contribute to the source code.
Contact and Support
Feel free to use the Contact form to submit questions, suggestions, or bug reports. I will try my best to answer as soon as possible, but since this is provided as free software, I cannot guarantee any specific response time.
Happy recordings! 🙂